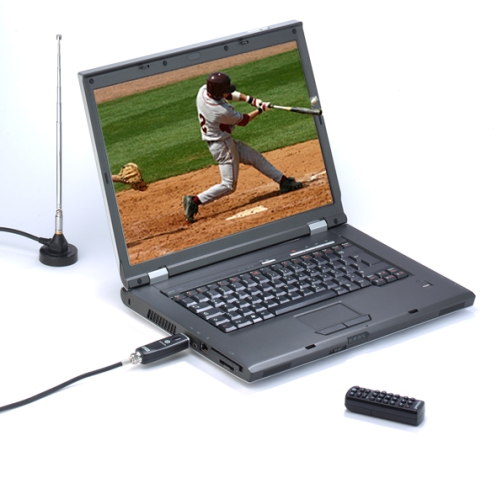
Free HDTV – over the air with Pinnacle HD PCTV.

•November 5, 2008 • Comments Off on Free HDTV – over the air with Pinnacle HD PCTV.

Windows XP TipsWindows XP Tips Windows Vista TipsWindows Vista Tips Ubuntu TipsUbuntu Tips Miscellaneous TipsOther Tips


pctv_hd_prostick_hw_lgHD Free-to-Air TV viewing has become popular in the past year, specially now that cable companies are switching to fully Digital and HDTV is becoming more of a standard.

However if you arent a HDTV subscriber and would like a free flexible alternative to watching HDTV on your PC, Pinnacle has created a sleek device, the PCTV HD Pro Stick.

The PCTV HD Pro handles Standard definition TV cable (NTSC) , HD (ATSC) and FM Radio. It also allows you to connect to your cable service directly into the wall using ClearQAM for any unencrypted digital signal (in most cases all your basic channels). The HD broadcast playback is up to 1080i, both on ASTC and ClearQAM and handle over-the-air SD/HD programming.

In our video review below PCWizKid sets up and installs the the PCTV HD Pro USB Stick (model 801e) in Windows Vista Ultimate (64 bit edition). However we also test it in Windows XP Pro 32bit which is basically the same when it comes to using the software provided by Pinnacle.

The Minimum System Requirements from Pinnacle are

  • Windows Vista™ (32 bit) or Windows XP with latest service pack
  • Intel Pentium® 4 2.4 GHz, Pentium M 1.3 GHz or AMD Athlon 64 processor (for HDTV reception, a Pentium 4 2.8 0GHz or Pentium M 1.7 GHz or equivalent AMD
  • Athlon 64 processor is recommended)
  • RAM: Windows Vista – 512 MB (1GB recommended) for Windows XP – 256 MB RAM (512 MB recommended)
  • A USB 2.0 port
  • Sound / graphics controller with support for DirectX 9 or higher
  • Hard drive with minimum 1 GB free space (20 GB recommended for TV recording)
  • CD/DVD drive to install the Pinnacle software or burn your recordings to

PCWizKid’s Test System Specs met and exceeded the recommended
– Intel Core Duo T7400(2.16GHz)
– 2 Gig of memory (PC2-5300 DDR2)
– 100 Gig Hard drive (5400 rpm SATA)
– ATI Mobility RADEON X1400
– Windows Vista Ultimate 64Bit and Windows XP Pro 32bit


Feature Summary

  • Supports both digital over-the-air (ATSC) and unencrypted digital cable (ClearQAM) HDTV.
    (The new digital broadcast standard, is now available in many areas of the United States and Canada. ATSC reception is dependent on many factors. The provided antenna will allow reception in areas where there is a good ATSC signal. In regions or rooms where the signal is not strong, an amplified rooftop antenna will be required. It is generally not possible to receive an ATSC signal while en route (e.g. in a car or train). Please consult with your local reseller or go to http://www.antennaweb.org for more information on areas covered and optimizing your reception. For ClearQAM Internet connection required; free 1 year trial. )
  • Stereo sound for both digital and analog TV
  • Stereo FM radio reception
  • Watch SD and free HD TV on your PC with the provided antenna
  • Mini remote control and high-gain telescopic antenna
  • Use your PC as a PVR with TimeShifting: pause, rewind TV
  • Electronic Program Guide (EPG)
  • Compatible with Windows® Media Center (provided in Windows Vista™)
  • VideoSpin editing software included
  • A/V adapter cable included for capture from your cable/satellite box or camcorder
  • Automatically record to your hard drive in MPEG-1/2 or DivX formats

Conclusions
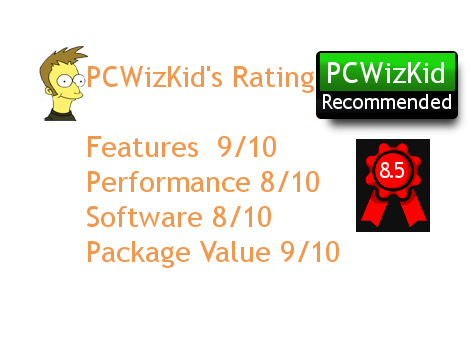
Overall the PCTV HD Pro Stick delivers a terrific package of features for PC TV viewing. The performance is good as long as you have a fast processor and enough free memory. Multitasking will slow things down, and the software included is a litle slow when changing channels in general, however the TVCenter Pro is intuitive to use. The flexibility in being ablt to connect to your existing cable outlet, receiver box or antenna is a big plus which ensures that where ever you go you have options for TV viewing. The free HD (ATSC) viewing was very good when the signal was above 80% and all the regular digital cable channels (using ClearQam) were excellent.
Considering it all, the value for the buck is exceptional for what your getting.

pctv_rating41

Mastering the Windows Registry

•October 19, 2008 • Comments Off on Mastering the Windows Registry

Windows XP TipsWindows XP Tips Windows Vista TipsWindows Vista Tips Ubuntu TipsUbuntu Tips Miscellaneous TipsOther Tips


PCWizKid has demonstrated how to hack and tweak your registry settings for optimizing your Windows configuration. Now lets take a look on how the registry is setup to better give you an understanding on what you are doing when you edit the registry next time.

First I cant stop reminding people to always do a Windows Restore point or backup your registry in case something goes wrong should you edit the registry and do something to it yourself.

To start the Registry Editor, click the Start button (in XP) or the ORB button (in Vista) and then click RUN and type regedit and press OK. Whatch the video walkthrough for a step by step walkthrough.

Hives

The registry is constructed as a database, and offers DB-like features such as automatic updates.

The Registry is split into a number of logical sections, or “hives”. Hives are generally named by their Windows API definitions, which all begin “HKEY”. They are abbreviated to a three- or four-letter short name starting with “HK” (e.g. HKCU and HKLM).

The HKEY_LOCAL_MACHINE and HKEY_CURRENT_USER nodes have a similar structure to each other; applications typically look up their settings by first checking for them in “HKEY_CURRENT_USER\Software\Vendor’s name\Application’s name\Version\Setting name”, and if the setting is not found look instead in the same location under the HKEY_LOCAL_MACHINE key. When writing settings back, the reverse approach is used — HKEY_LOCAL_MACHINE is written first, but if that cannot be written to (which is usually the case if the logged-in user is not an administrator), the setting is stored in HKEY_CURRENT_USER instead.

HKEY_CLASSES_ROOT

Abbreviated HKCR, HKEY_CLASSES_ROOT stores information about registered applications, such as file associates and Object Class IDs tying them to the applications used to handle these items. On Windows XP and Vista HKCR is a compilation of HKCU\Software\Classes and HKLM\Software\Classes. If a given value exists in both of the subkeys above, the one in HKCU\Software\Classes is used.

HKEY_CURRENT_USER

Abbreviated HKCU, HKEY_CURRENT_USER stores settings that are specific to the currently logged-in user. The HKCU key is a link to the subkey of HKEY_USERS that corresponds to the user; the same information is reflected in both locations. On Windows-NT based systems, each user’s settings are stored in their own files called NTUSER.DAT and USRCLASS.DAT inside their own Documents and Settings subfolder (or their own Users subfolder in Windows Vista). Settings in this hive follow users with a roaming profile from machine to machine.

HKEY_LOCAL_MACHINE

Abbreviated HKLM, HKEY_LOCAL_MACHINE stores settings that are general to all users on the computer. On NT-based versions of Windows, HKLM contains four subkeys, SAM, SECURITY, SOFTWARE and SYSTEM, that are found within their respective files located in the %SystemRoot%\System32\Config folder. A fifth subkey, HARDWARE, is volatile and is created dynamically, and as such is not stored in a file. Information about system hardware drivers and services are located under the SYSTEM subkey, while the SOFTWARE subkey contains software and Windows settings.

HKEY_USERS

Abbreviated HKU, HKEY_USERS contains subkeys corresponding to the HKEY_CURRENT_USER keys for each user profile actively loaded on the machine, though user hives are usually only loaded for currently logged-in users.

HKEY_CURRENT_CONFIG

Abbreviated HKCC, HKEY_CURRENT_CONFIG contains information gathered at runtime; information stored in this key is not permanently stored on disk, but rather regenerated at the boot time.

Backing up the registry
The entire registry can be backed up more easily as it is just a small number of files in specific locations. Click here to learn how to backup your registry in this video tutorial.

For Windows XP

1. Click Start, click Run, type %SystemRoot%\system32\restore\rstrui.exe, and then click OK.
2. On the Welcome to System Restore page, click Create a restore point, and then click Next .
3. On the Create a Restore Point page, type a name for the restore point and then click Create
4. After the restore point has been created, click Close.

For Windows Vista
1. Click StartStart button, type systempropertiesprotection in the Start Search box, and then press ENTER.
User Access Control permission If you are prompted for an administrator password or for a confirmation, type the password, or click Allow.
2. Wait for Windows to search for available disks and most recent restore points. In the System Properties dialog box, on the System Protection tab, click Create,
3. Type a name for the restore point and then click Create.
4. After the restore point has been created successfully, click OK two times.

Other Registry Tweaks Users read and watched

3D Cube Virtual Desktop for Windows

•October 10, 2008 • Comments Off on 3D Cube Virtual Desktop for Windows

Windows XP TipsWindows XP Tips Windows Vista TipsWindows Vista Tips Ubuntu TipsUbuntu Tips Miscellaneous TipsOther Tips


DeskSpace (formally knows as Yod’m 3D) significantly increases your desktop space, allowing you to work and play on multiple desktops. It is for Windows XP and Vista. We have seen this in Ubuntu’s Compiz Fusion desktop effects already here aswell.

With DeskSpace you can work with multiple desktops in 3D, and quickly switch between desktops using the mouse and keyboard.

PCWizKid has been given the latest version 1.5.5.3 of the software and made a brief video review of the desktop enhancement program from Okatu Software.

The minimum system requirements for DeskSpace are:

* Windows XP, Windows Vista, or Windows Vista x64.
* 800 Mhz CPU.
* 256 MB RAM.
* 16 MB DirectX 8.1 compatible video card *.

* Minimum ATI Radeon 7200 or nVidia GeForce 2 required. Video cards based on the nVidia TNT2, ATI Rage Pro/128, and Intel Extreme chipsets may work, but are not supported.

Eliminate Desktop Clutter
Don’t have enough space to fit all your icons and windows on a single desktop? DeskSpace gives you more room to store everything you need for your day-to-day work and play.

DeskSpace eliminates desktop clutter by giving you the ability to store your windows and desktop icons across multiple desktops.

Get Organized
Does limited desktop space make it hard for you to stay organized? DeskSpace helps you organize your work flow, allowing you use a separate desktop for each of your tasks. With DeskSpace, you could have a one desktop for web browsing, a separate desktop for word processing, and another desktop for spreadsheets.

Here are some key features of “Deskspace”:

  • Work and play on multiple desktops.
  • Display multiple desktops in stunning 3D.
  • Quickly switch between desktops using the mouse and keyboard.
  • Drag windows between desktops by moving them to the sides of the screen.
  • Display desktops in 3D on multiple monitors.
  • Configure the hot keys and mouse buttons used to switch between desktops, and how DeskSpace displays and manages desktop.
  • Use DeskSpace in multiple languages.

Other Tips Users have watched